
As the cost and risks associated with data breaches continue to climb, cybersecurity is a topic that should be a priority for every B2B SaaS company. Recently, IBM published that the average cost of a data breach is $3.86 million. With so much at stake, organizations can’t afford to ignore security best practices.
With Salesforce being the central hub of information for many SaaS companies, it’s no surprise that organizations are focused on keeping their Salesforce instance and integrations secure. The good news is, Salesforce is an extremely secure platform.
However, there are still basic steps all organizations need to take to minimize external threats and breaches caused by employee error or malicious intent. Here are five basic Salesforce security tips (with steps and screenshots for each included) to make your instance more secure.
1. Two-Factor Authentication
Interface Logins
Setting up two-factor authentication is a simple way to increase the level of security of your instance. There are two ways two-factor authentication can be leveraged in Salesforce. The most basic way is to enable two-factor authentication for logins. This adds another layer of security by asking each user to verify their identity via an authentication App or text message/call every time they login to your Org. Here’s a great video on how to setup two-factor authentication for logins in Salesforce.
Pro Tip: Use the Salesforce Authenticator App for two-factor authentication.
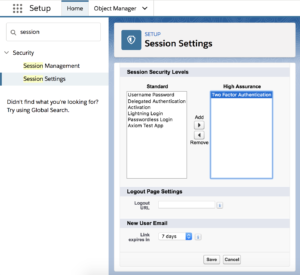
Two-Factor Authentication for Reports
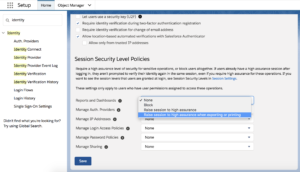
Two-factor authentication can also be leveraged in Salesforce to protect access to reports. To turn on two-factor authentication for users accessing reports, in Setup under “Session Security Levels”, the Admin(s) can “Raise the session level to High Assurance” as seen in the screenshot below. This will prompt users trying to access reports to verify their identity through two-factor authentication.
How to Control Access to Reports
How to Control Access to Printing and Exporting Reports
Salesforce can also be configured to prompt users to verify their identity only when exporting or printing reports. To do this, in Setup type in “Identity Verification” and under “Security Level Policies” enable “Raise the Session to High Assurance” which will prompt users to authenticate when they try to export data or access certain reports.
2. Configure Network Based Security
Org-wide Configuration
Ensure the Trusted IP range feature is configured in Salesforce. A trusted IP range is a list of safe or known IP addresses Salesforce users can login from. An organization’s trusted IP range usually includes office locations and other private networks that employees access. Once you set up a trusted IP range, users that login outside of that range are challenged to verify their identity to access Salesforce. For example, if an employee had a demo at a prospect’s office, when logging into Salesforce they’d be forced to use two-factor authentication.
How to Set up Org-Wide Configuration
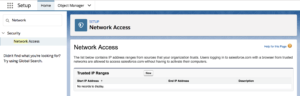
In Setup search for Network Access and click “New” to create a new trusted IP Range.

Pro Tip: If you plan to have multiple trusted ranges, add informative descriptions to specify which range applies to which use case.
3. Track Login History in Salesforce
Tracking Login History is another easy way to increase the security of your instance. Salesforce even provides a standard report called “New Login Location Report”.
Why Track Logins?
For example, if a salesperson is using an application like WorkBench, Browser, Data Loader, etc. to export leads, this could signal that employee is preparing to leave the organization. And they might be trying to take leads and other confidential information with them.
How to Track Logins
Search for Login History under the Setup menu.

4. Enable App Allowlisting (formerly Whitelisting)
With the rise of OAuth, it’s easier than ever before for employees to install an App in Salesforce. This is problematic because not all employees understand (nor should they be expected to) all the factors that are taken into consideration when vetting if a 3rd party application should have access to Salesforce. To prevent an employee from accidentally giving a solution access to Salesforce, App Allowlisting (formerly Whitelisting) should be enabled in the Org. This will block end users from giving solutions access to Salesforce.
Here’s an example of why enabling App Allowlisting in your Org is so important. Let’s say a well-meaning employee gives an instant messaging platform access to Salesforce so they can receive notifications about Opportunities. While that employee may have only good intentions, they might not realize that giving that platform access to Salesforce violates their organization’s HIPAA or GDPR compliance. The employee in question isn’t aware they’re doing anything wrong and it could take days to months to discover this change has been made and correct it.
In the age of compliance, organizations have to invest in properly configuring Salesforce. Enabling App Allowlisting in Salesforce allows the Admin(s) to specify which Apps users can grant access to. This can be managed at the org-wide level (all users), or for specific users. It’s a scalable solution because it applies the same limitations to new users, and provides a centralized location to manage user authorization.
How to Enable App Allowlisting (formerly Whitelisting)
Step 1: App Allowlisting must be set up by Salesforce for your Org. The Admin(s) of your instance need to submit a case or call Salesforce to ask that this feature be enabled.
After Salesforce has enabled App Allowlisting in your Org, you can assign certain Profiles and Permission Sets access to specific Apps. In the following example, we use Data Loader because it’s a commonly used and very powerful App. However, not every user should have access to it.
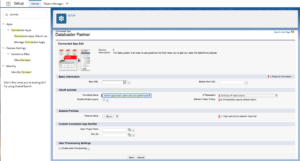
Step 2: Under “Manage Connected Apps”, click “Edit” next to Dataloader Partner.
Step 3: Under “Manage Connected Apps”, click “Edit” next to Dataloader Partner. Step 3: Under OAuth policies, Permitted Users select “Admin approved users are pre-authorized”.
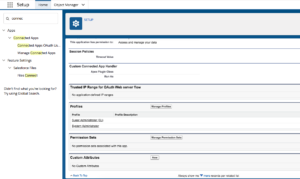
Step 4: Under “Manage Connected Apps” if you click the Data Loader label to bring up the Connected App Detail, you may assign Profiles and Permission Sets to have access to the App.
5. Invest in a Dedicated Salesforce Integration User
More and more businesses are taking advantage of integrating AppExchange Apps and other paid tools with their Salesforce instance. What does this mean for Salesforce Admins? It means most Admins today are managing a Salesforce ecosystem instead of just a Salesforce instance.
How do you ensure all your integrations are stable, auditable, and secure?
An easy way to address this challenge is to invest in a Dedicated Salesforce Integration User. Not only will this help manage integrations more seamlessly but, more importantly, it will also increase the security of your instance.
What is an Integration User?
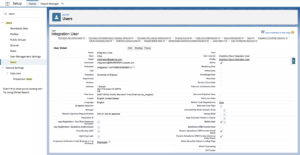
An Integration User can be an Admin’s best friend. It’s a dedicated (not used by any human) full Salesforce license that has a custom Profile, Permission Set, and is used for any 3rd party integrations, like: marketing automation, CTIs, data enrichment tools, and even your own custom API work. Integration Users are particularly important for these kinds of tools because they tend to update thousands (or tens of thousands) of records per day.
We feel so passionate about this topic that we’ve dedicated two blog posts to it:
- Why You Need A Dedicated Salesforce Integration User
- How to Create a Dedicated Integration User in Salesforce
If you have a heavily integrated Salesforce instance we recommend reading the posts above and deciding if a Dedicated Integration User is a good investment for your organization.
Wrap Up
We hope you found this post helpful and are walking away with actionable insights on how to set up and manage a more secure instance of Salesforce. Have questions about how to increase the security of your Salesforce instance? Sign up for our newsletter! We send out a monthly recap of our latest Salesforce content, including articles on security best practices, actionable insight on Salesforce optimization for enterprises, and more.