
Lightning Web Component Slots are a valuable tool for any Salesforce Developer to add to their arsenal. In this blog, we’ll review what they are, what they do, and how to use them.
What are LWC slots?
A slot ( ) is a placeholder for markup that a parent component passes into a component’s body. Salesforce Developer Guide further explains Slots as follows: “Add a slot to a component’s HTML file so a parent component can pass markup into the component. A component can have zero or more slots.”
The concept behind Slots is essentially to use a template structure, and then be able to reuse that structure in different components with different data.
What does this mean for developers?
First of all, this gives Developers the ability to compose complex applications with nested components, allowing for greater modularity and reusability. With that being said, you might be wondering how this is different from the pattern you probably already know – that of a parent component which instantiates child components and sets their properties (the data-driven approach).
There are two major aspects we need to consider when using slots:
- Markup vs properties – The parent component passes markup into the slotted component. (The key word here is markup.) This is the declarative approach.
- Complexity – Managing the lifecycle of the components in a declarative way using slots is more complex when compared to that of the data-driven approach.
Markup vs Properties
So what does it mean to pass markup to a component via slots?
When a component implements slots, the application using it has the flexibility of deciding what information goes into the slots. The component now provides the general layout which other components can use based on their own requirements.
On the other hand, using the @api decorator to expose public properties and functions allow the parent component to pass data to the child component in order to communicate down the hierarchy. If needed, the child then communicates back with the parent by dispatching DOM events.
In simple terms: if you want to pass data from parent to child use the @api decorator, if you want to pass markup use slots.
Example
Let’s go over a Lightning Web Component example called “banner” which has three named slots: “icon”, “title” and “message”. These slots represent the main regions of the component that can be customized using markup from a parent component.
This is the code:
<template>
   <div class="slds-box slds-theme_default">
       <div class="slds-media">
           <div class="slds-media__figure">
               <slot name = "icon">
                   <lightning-icon icon-name="utility:display_text" size="medium"
                   alternative-text="Banner information"></lightning-icon>
               </slot>
           </div>
           <div class="slds-media__body">
               <slot name = "title">Banner title
               </slot>
           </div>
       </div>
       <div class="slds-var-m-top_small">
           <slot name = "message">Banner message</slot>
       </div>
   </div>
</template>
This is what the component looks like in its most basic form:

Here are a few notable things to mention about the component:
- It consists of an slds-box with two slots for an icon and the title, and one slot for the main content of the banner
- A slot is declared as follows:
<slot name=”icon”>Your default markup goes here</slot> - When a parent component passes markup into the slot, the child’s default markup is replaced
- We used named slots in this example. It is preferable to use named slots if you have more than one slot, otherwise the markup passed from the parent is added into all the unnamed slots
A parent component can then customize the contents as needed. Below is the code for a component called “bannerWrapper” which instantiates the “banner” component three times by passing a different markup each time. This is the code:
<template>
   <c-banner>
       <div slot="icon">
           <lightning-icon icon-name="standard:portal" size="large"
           alternative-text="Banner information"></lightning-icon>
       </div>
       <div slot="title" class="slds-text-heading_small">
           <strong>Salesforce MFA Roll-out</strong>
           <div>Webinar: 03/06/2022, 7PM</div>
       </div>
       <div slot="message">
           We will discuss what MFA is and the benefits it brings.
       </div>
   </c-banner>
   <c-banner>
       <div slot="icon">
           <lightning-icon icon-name="action:new_opportunity" size="small"
           alternative-text="Banner information"></lightning-icon>
       </div>
       <div slot="title" class="slds-text-heading_small
                   slds-align_absolute-center slds-text-color_success">
           <em>New high-value Opportunity won!</em>
       </div>
       <div slot="message" class="slds-align_absolute-center">
           Congratulations on closing a high-value opportunity.
       </div>
   </c-banner>
   <c-banner>
       <div slot="icon">
           <lightning-icon icon-name="action:announcement" size="small"
           alternative-text="Banner information"></lightning-icon>
       </div>
       <div slot="title" class="slds-text-title_caps
               slds-text-align_right slds-text-color_destructive">
           <strong>Maintenance window</strong>
       </div>
       <div slot="message">Please note that the Support Team will be performing a release
       update after business hours. The maintenance window is scheduled to begin at 8PM
       and is going to last 15 minutes.
       </div>
   </c-banner>
</template>
This what the result looks like:
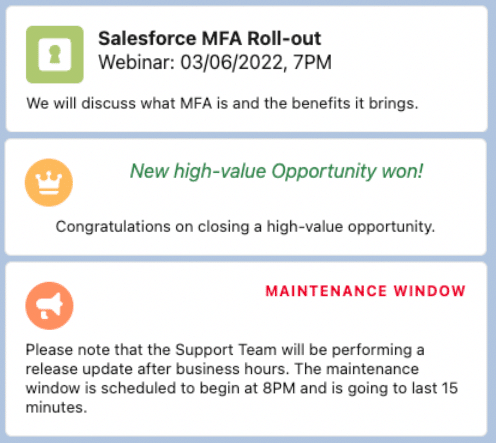
This may be a simple example, however, the result is highly customizable and allows the “banner” component to be used in multiple applications that require a high degree of style and content customization.
Complexity
There is an added layer of complexity whenever a declarative approach is used and data needs to be passed from the parent to the child component.
In these scenarios, the parent component is responsible for managing the lifecycle of the content being passed in the slots. This means that the parent component needs to know when the child component registers/unregisters. The process is explained in far more detail in the official Salesforce documentation here.
In contrast, a data-driven approach simplifies this process by virtue of its reactive nature. When data changes at the parent level, the child is reactive and updates as well.
Conclusions
The main benefit of using slots is the flexibility they provide in terms of composition. We have seen in the previous examples how a simple component can be customized in various ways. A data-driven approach, however, is preferred for complex scenarios where the parent component needs to handle the data flow to the child component.