
This post was written for marketing teams leveraging Salesforce Marketing Cloud who want to maximize their efficiency when sending emails.
Instead of building a unique email from scratch for every send, with Marketing Cloud and MJML, you can create email templates and blocks of content that can be reused across multiple emails, reducing the development time required for each email.
Often marketing departments struggle with a lack of Marketing Cloud knowledge or experience, limiting who on the team can contribute to email sends. Leveraging content blocks also makes creating emails easier, allowing more people on your team to learn and contribute to the organization’s email marketing efforts.
Salesforce Marketing Cloud: What Is MJML?
MJML is an open-source markup language that makes writing HTML emails easier. It uses a simple syntax that converts the MJML code into HTML. The conditional statements and media queries you would typically have to write to ensure your email content is viewable in all email clients are automatically included when you render it to HTML, making emails significantly easier to create.
Marketers can leverage MJML to create custom content blocks that contain a variety of components, from images to dynamic content that changes depending on the recipient.
Why Use MJML to Create Content Blocks in Marketing Cloud?
One of the primary benefits of using MJML to create content blocks is it ensures your code will render correctly across all different desktop and mobile clients. How does it do this? It is a transpiler written in ReactJS that takes your easy-to-write MJML code and produces the compatible, responsive, HTML version of that same code that would have otherwise been more difficult and time-consuming to write.
Writing HTML emails is cumbersome and more volatile than writing HTML for the web because each email client renders HTML differently. This makes it a complex process for even experienced web developers. MJML abstracts away the boilerplate HTML, CSS, and conditional statements necessary to make emails look good across all clients, and ensures your emails always look great.
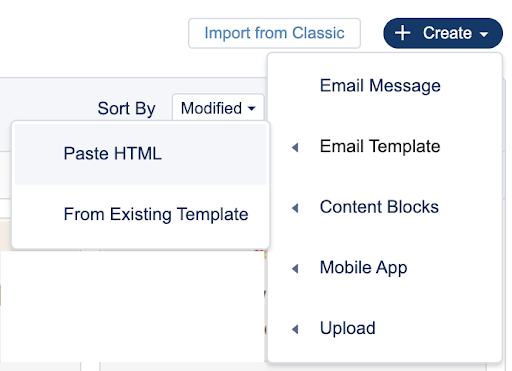
How to Use MJML to Create Custom Content Blocks in Marketing Cloud
There are two ways to use MJML to make your own custom content blocks in Marketing Cloud. One, if you have a code editor on your computer like Visual Studio Code or Atom, you can install it onto your machine (please see the instructions here).
Alternatively, you can use an online editor. In the remainder of this post, we’ll demonstrate how to create your own template, along with a content block (the coding process is the same for locally vs. online).
Note: This is a simple demonstration meant to show you what is possible using this approach. You’ll need to experiment to find what workflow works best for you.
When you open up the online editor, you will see this MJML already populated for you to start with.

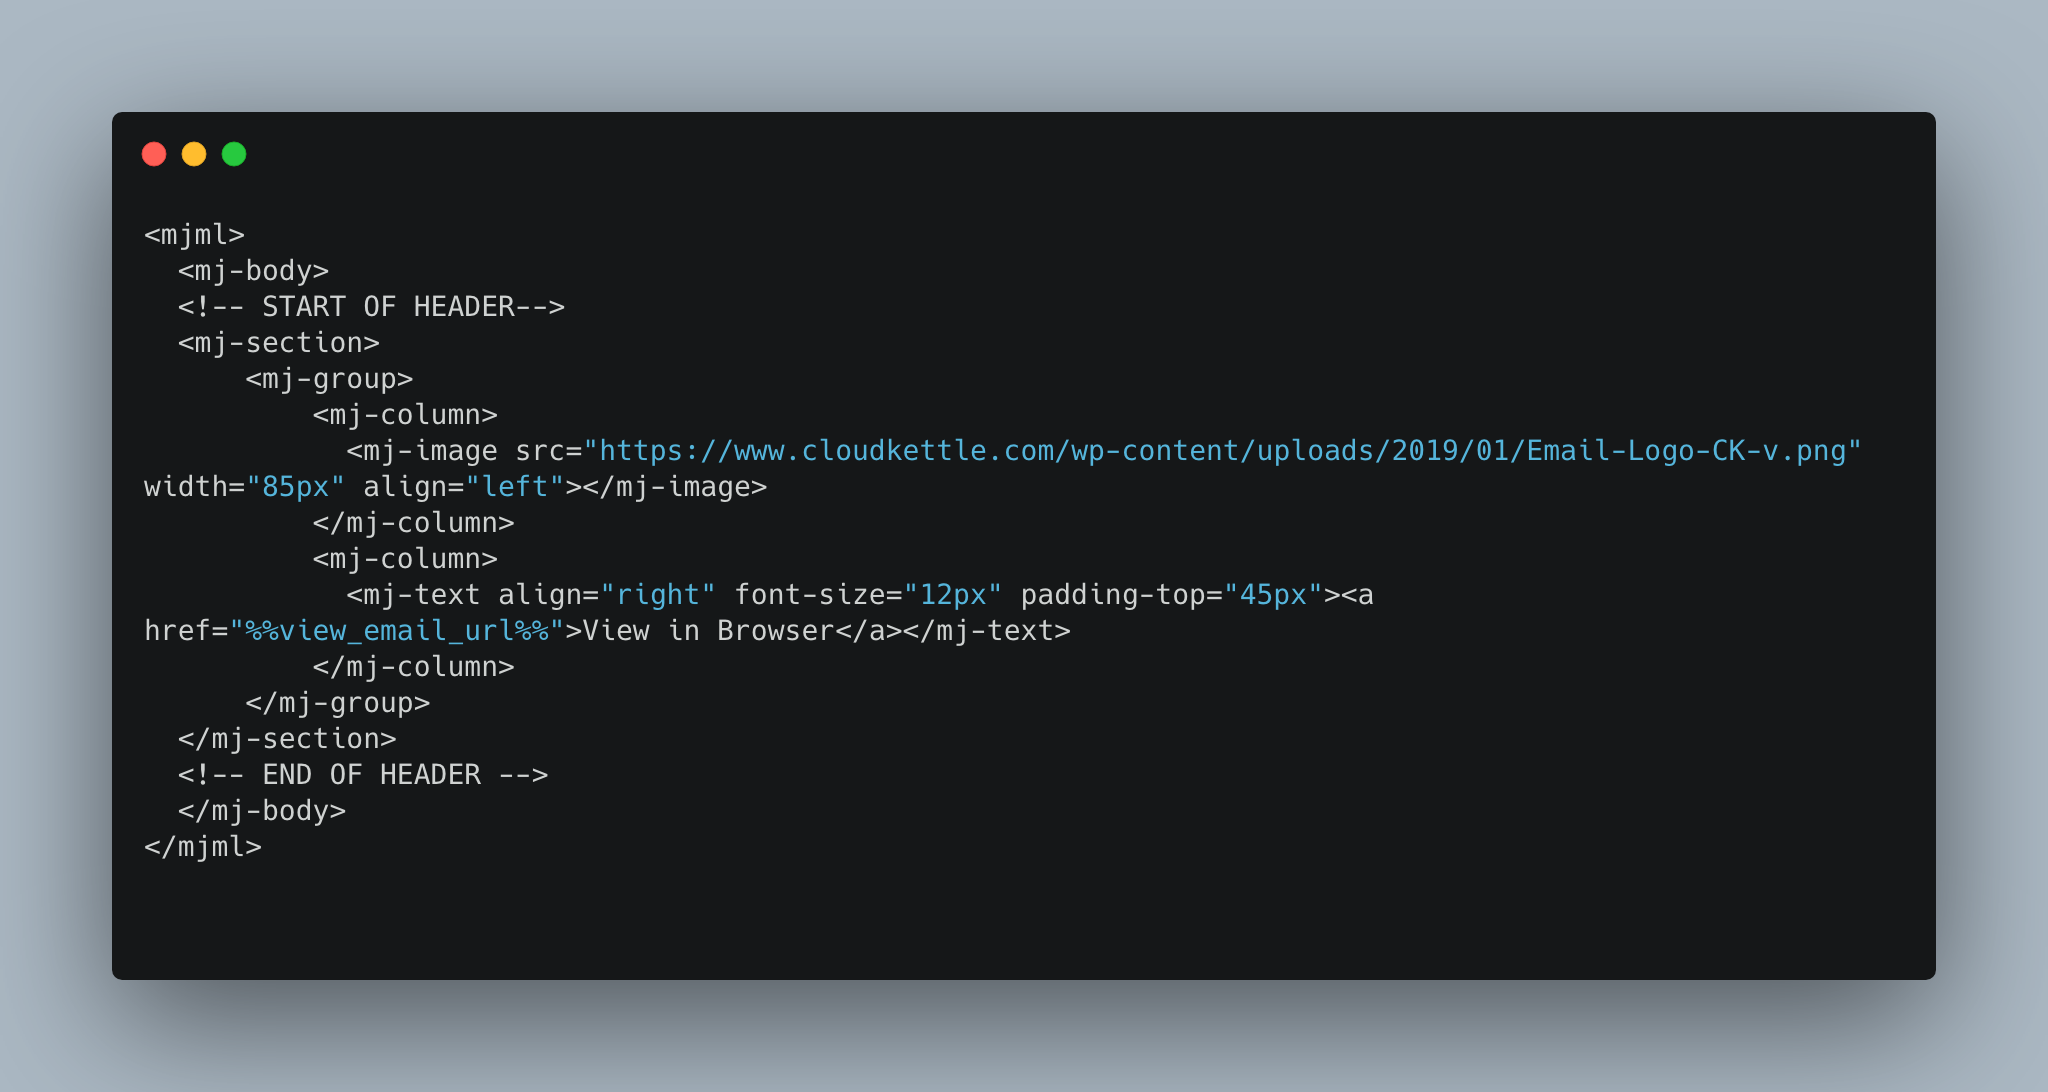
Start by creating a simple template that contains a header, a slot for a Marketing Cloud content block, and a footer. To begin, delete everything inside the <mj-section> tag, as we’re going to use this as our header section and walk through the steps to create a header like the one below.

Next, add two columns to the section, one aligned to the left with an image tag, and one aligned to the right with a text tag. Within the text tag add an <a> tag to make a link. Then, add attributes from the MJML documentation to achieve your desired look.
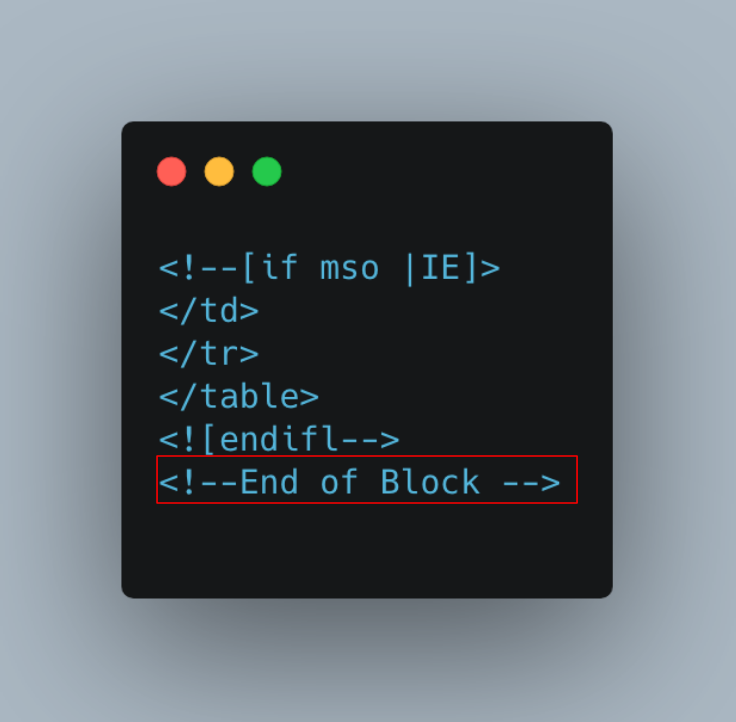
To make sure the columns don’t stack when viewed on mobile, put them inside an <mj-group> tag. Finally, to keep our generated HTML clear, add HTML comments to indicate the start and end of our blocks. For example: <!– START OF HEADER–>. This allows us to more easily extract the correct pieces of code later on. Your code should look similar to the code below.
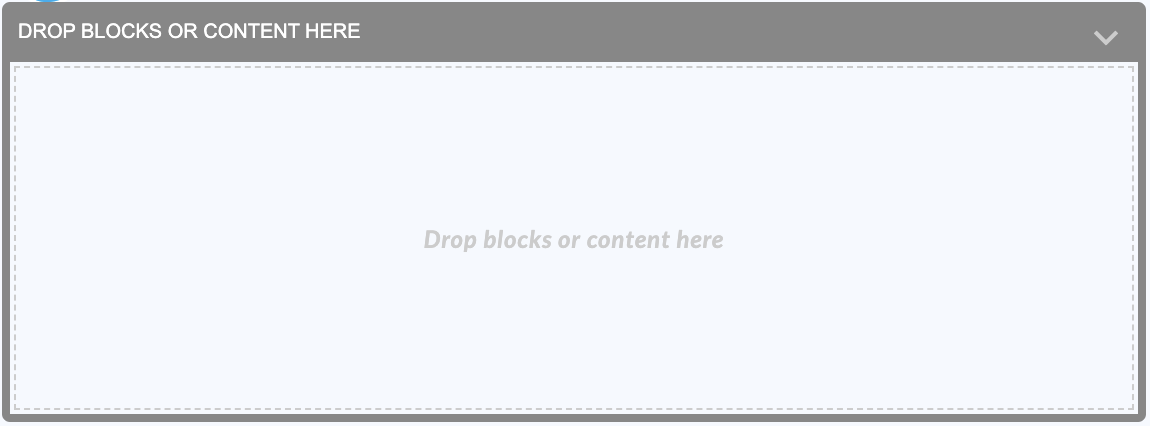
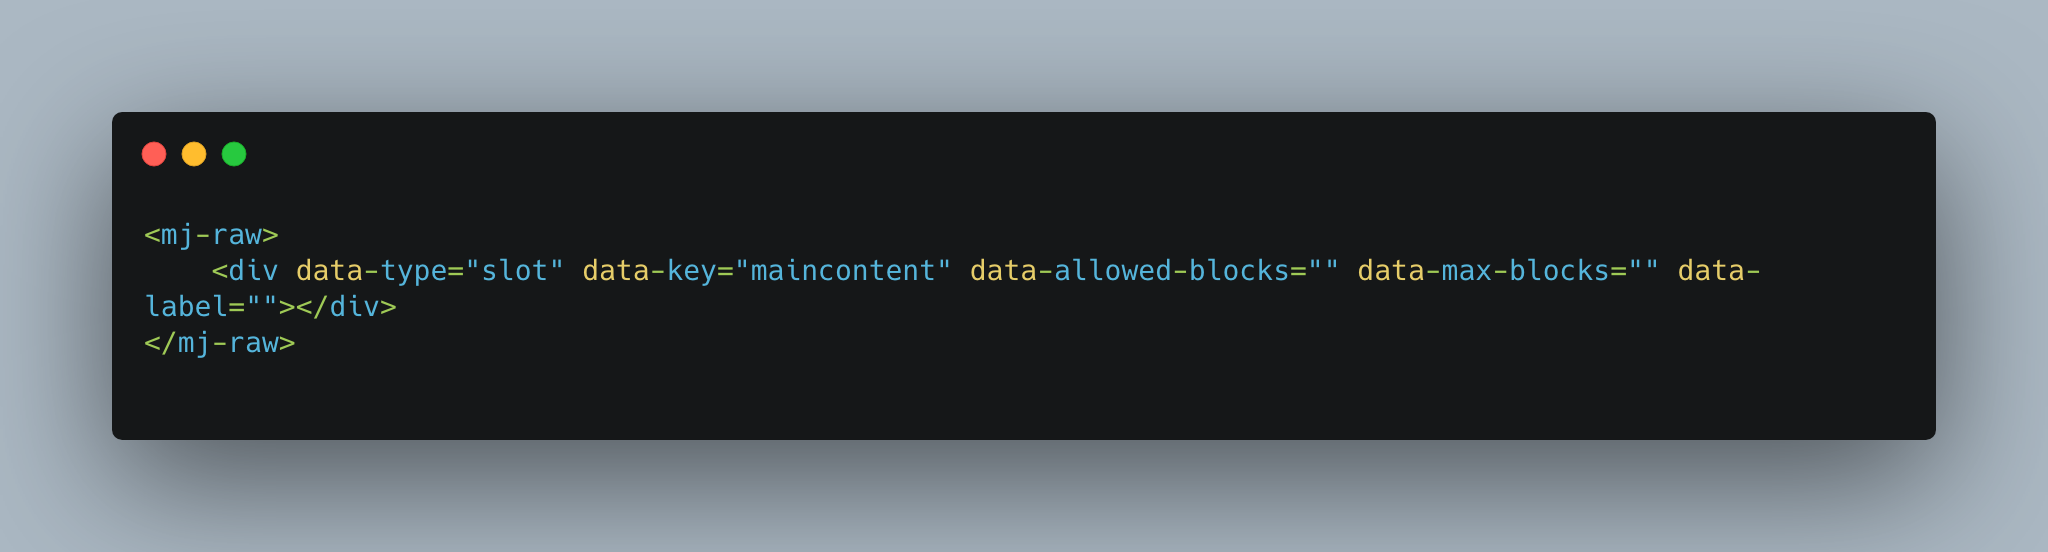
Up next, let’s add a slot for content in Marketing Cloud. You won’t see this slot in your preview screen, but in Marketing Cloud it will appear as the block below.
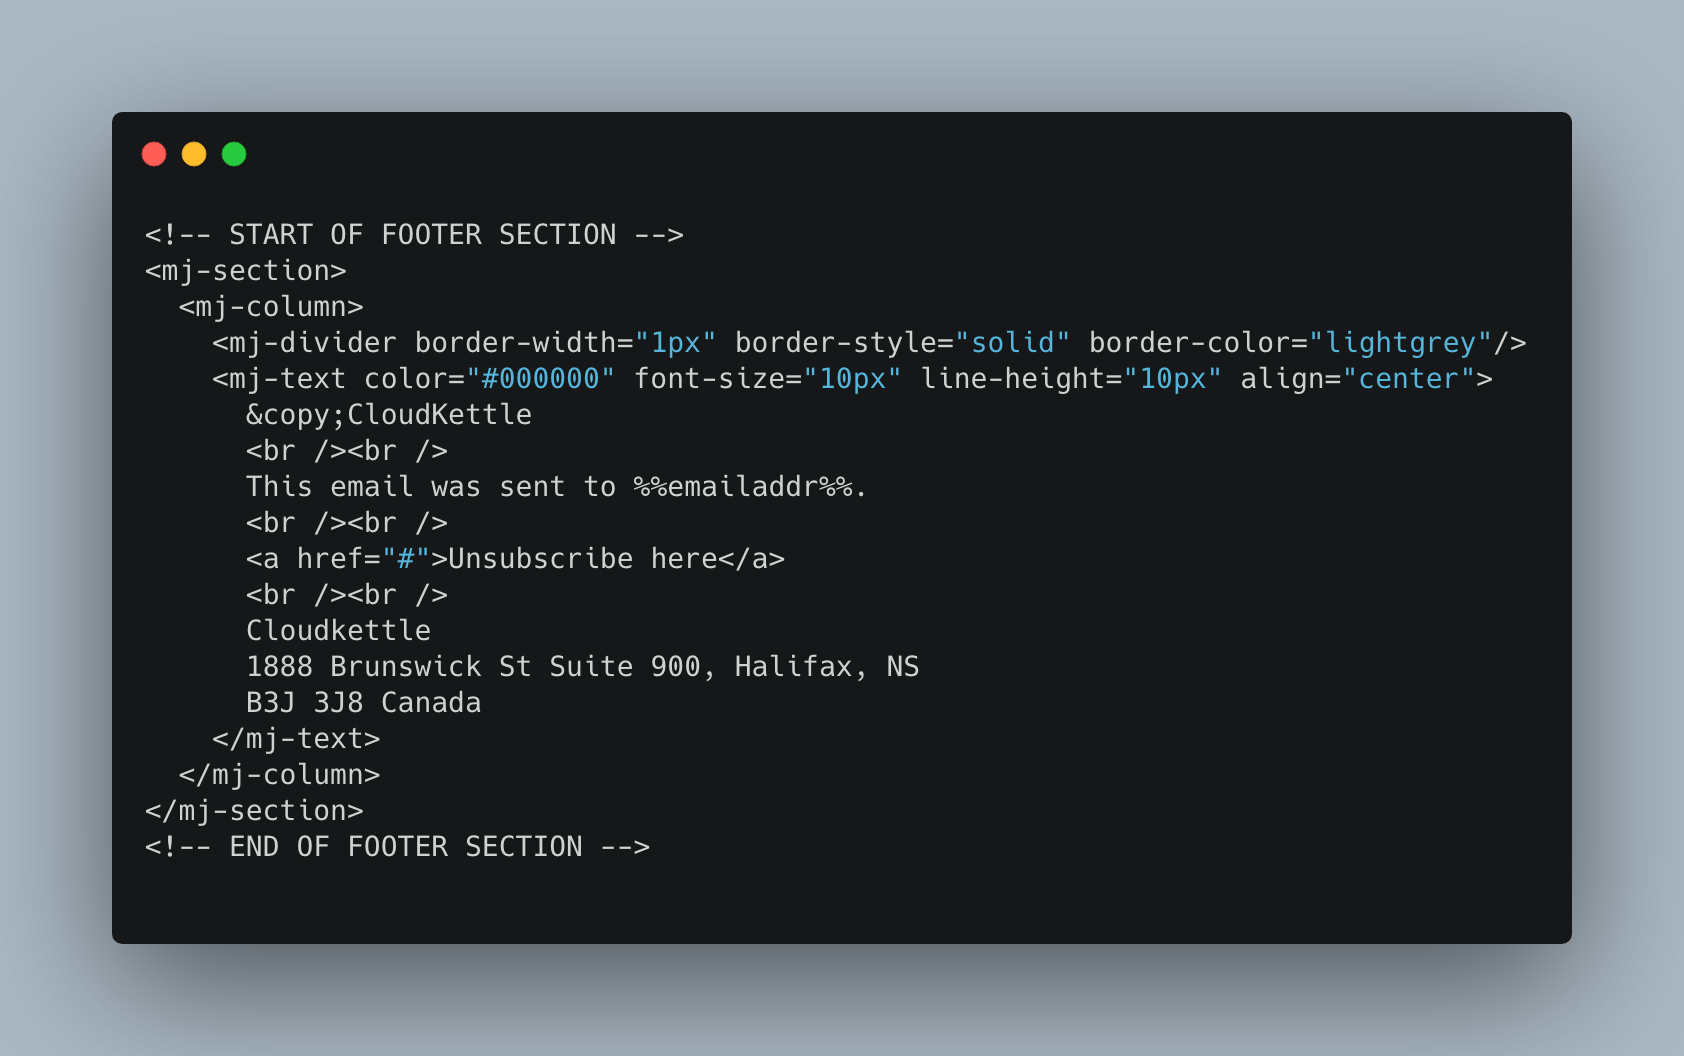
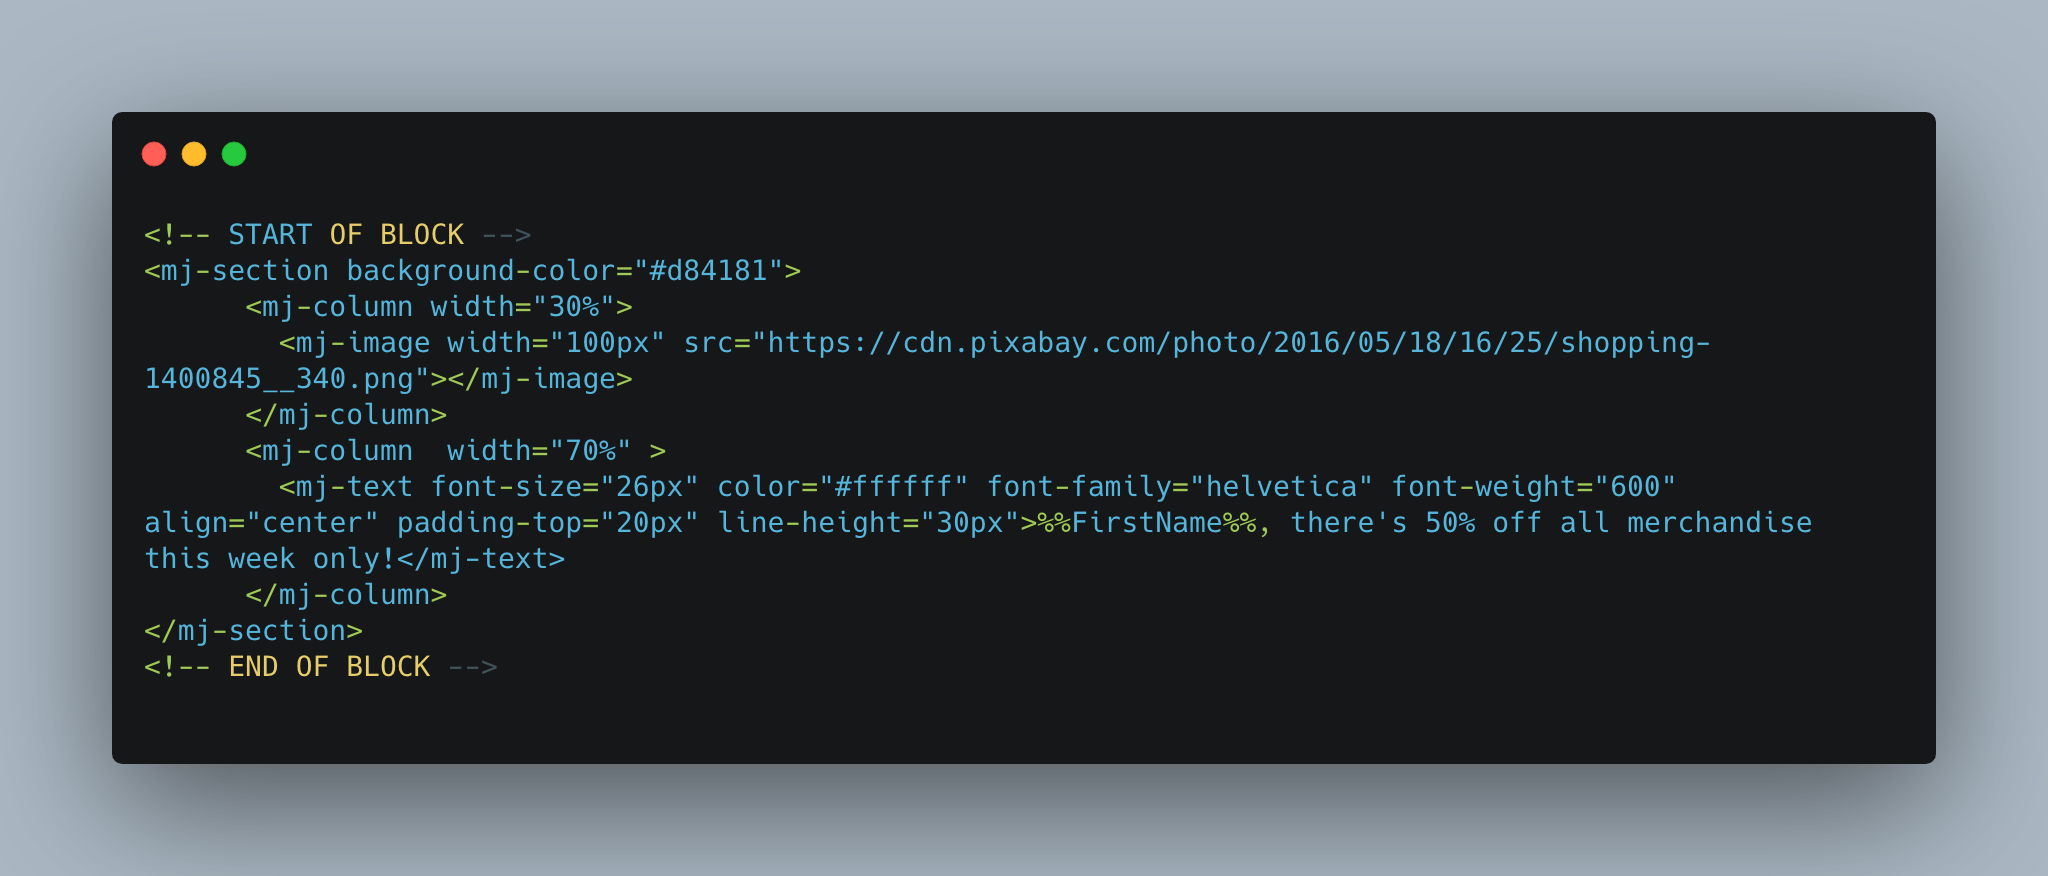
Now it’s time to add the footer. To create a simple section with one column that’s CAN-SPAM compliant, look at the example below. Notice I’ve added the personalization string %%emailaddr%%; you can get the send email address automatically using this personalization string.
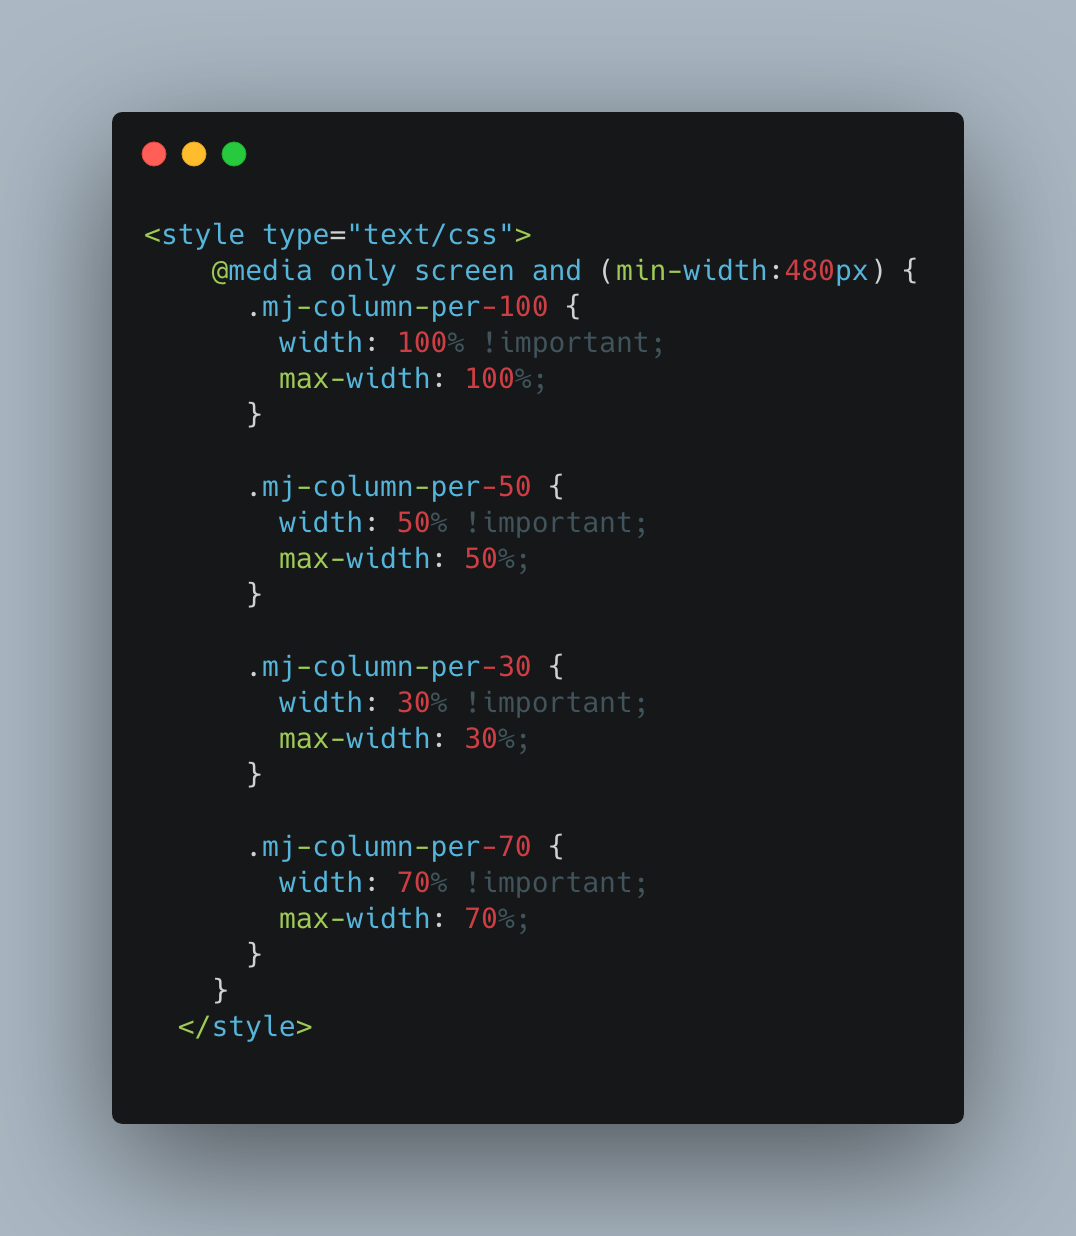
Now that your template is built, take note of the generated HTML and how MJML has added all of the CSS classes, including MJML specific classes. For example, .mj-column-per-50, which ensures that when you have two columns in a section, like the header section, they will always each take up fifty percent of that section’s width.
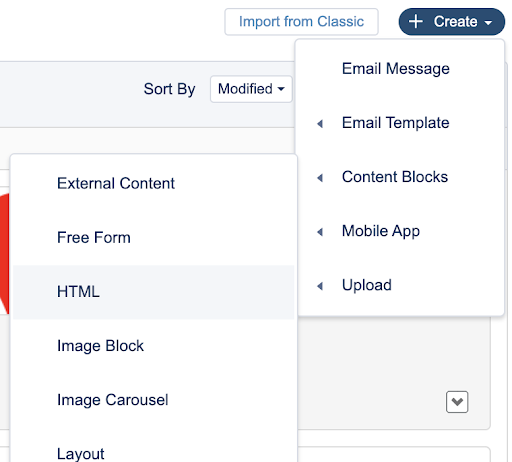
Now, in your instance of Marketing Cloud navigate to Content Builder, click create, and paste your generated HTML to create your new email template. You can test out your template by making a new template based email and plugging in any content blocks you have.
Now, let’s make a content block to plug into our template. Look at the MJML documentation again to see what kind of components you want to include in your block. If you’re looking to practice, try and complete the following steps:
Get rid of the divider
- Two columns instead of one, and change the widths of them
- Put the image in one column with the text in the other column
- Replace the image and text with your own and add in some styling to the mj-text component
- Add a background colour to the entire block by adding the field to the mj-section tag
- Add the HTML comments to see the start and end of your block so we can pull out only its code from the generated HTML.
- Add a personalization string to your text using a value from the data extension you’re sending to.
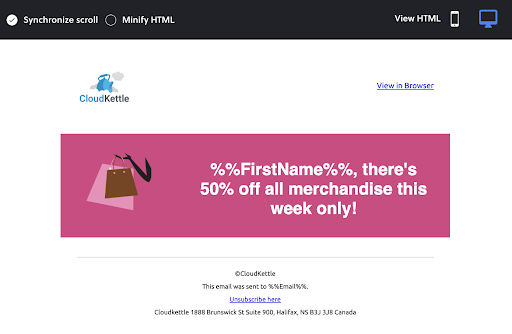
Here’s what the content block you created should look like in your template, once you have completed the steps above. You can also view what your block will look like on mobile devices by clicking the mobile device image on the top right of your screen, above the preview.
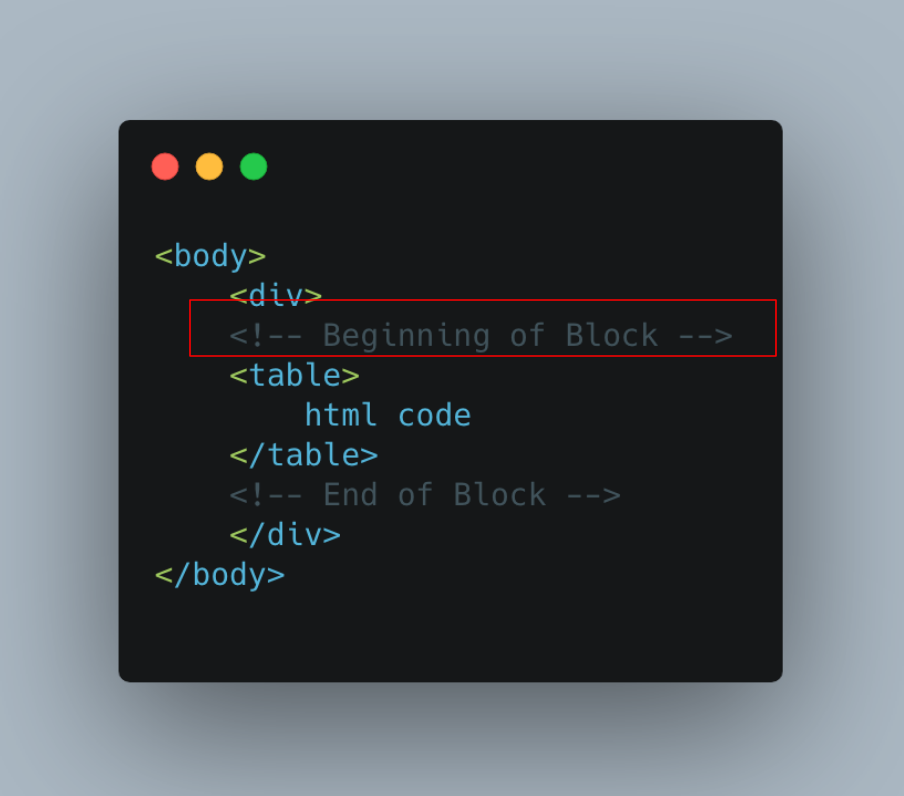
To take a look at the HTML you just made click the “View HTML” button on the top right of the preview screen. Locate where our content block starts and ends using our HTML comments in the code and copy all of the code in between your “Start of block” and “end of block” comments.
Next, paste that code into a new HTML content block in Content Builder.
Alternatively, you can copy all of your generated HTML and paste it into a new HTML email in Marketing Cloud. However, if you do this, you’ll have to code a new email every time you want to send a unique email instead of reusing content you’ve already made.
If we take a look back at our generated HTML, you’ll see that some new styles were added to the template when the HTML is generated with our block included. We’re going to need to make sure our template also includes these new classes, like seen below. You can simply go into the HTML of your template and add the new classes in with the other mjml classes, or generate the template again with all of your blocks in it to ensure every style will be included. It’s best to keep a copy of the MJML you used to write the template and content block so you can easily change them and regenerate the HTML in the future.
This is where it will be important for you to experiment and find the workflow that makes the most sense for you, as there is no right or wrong approach.
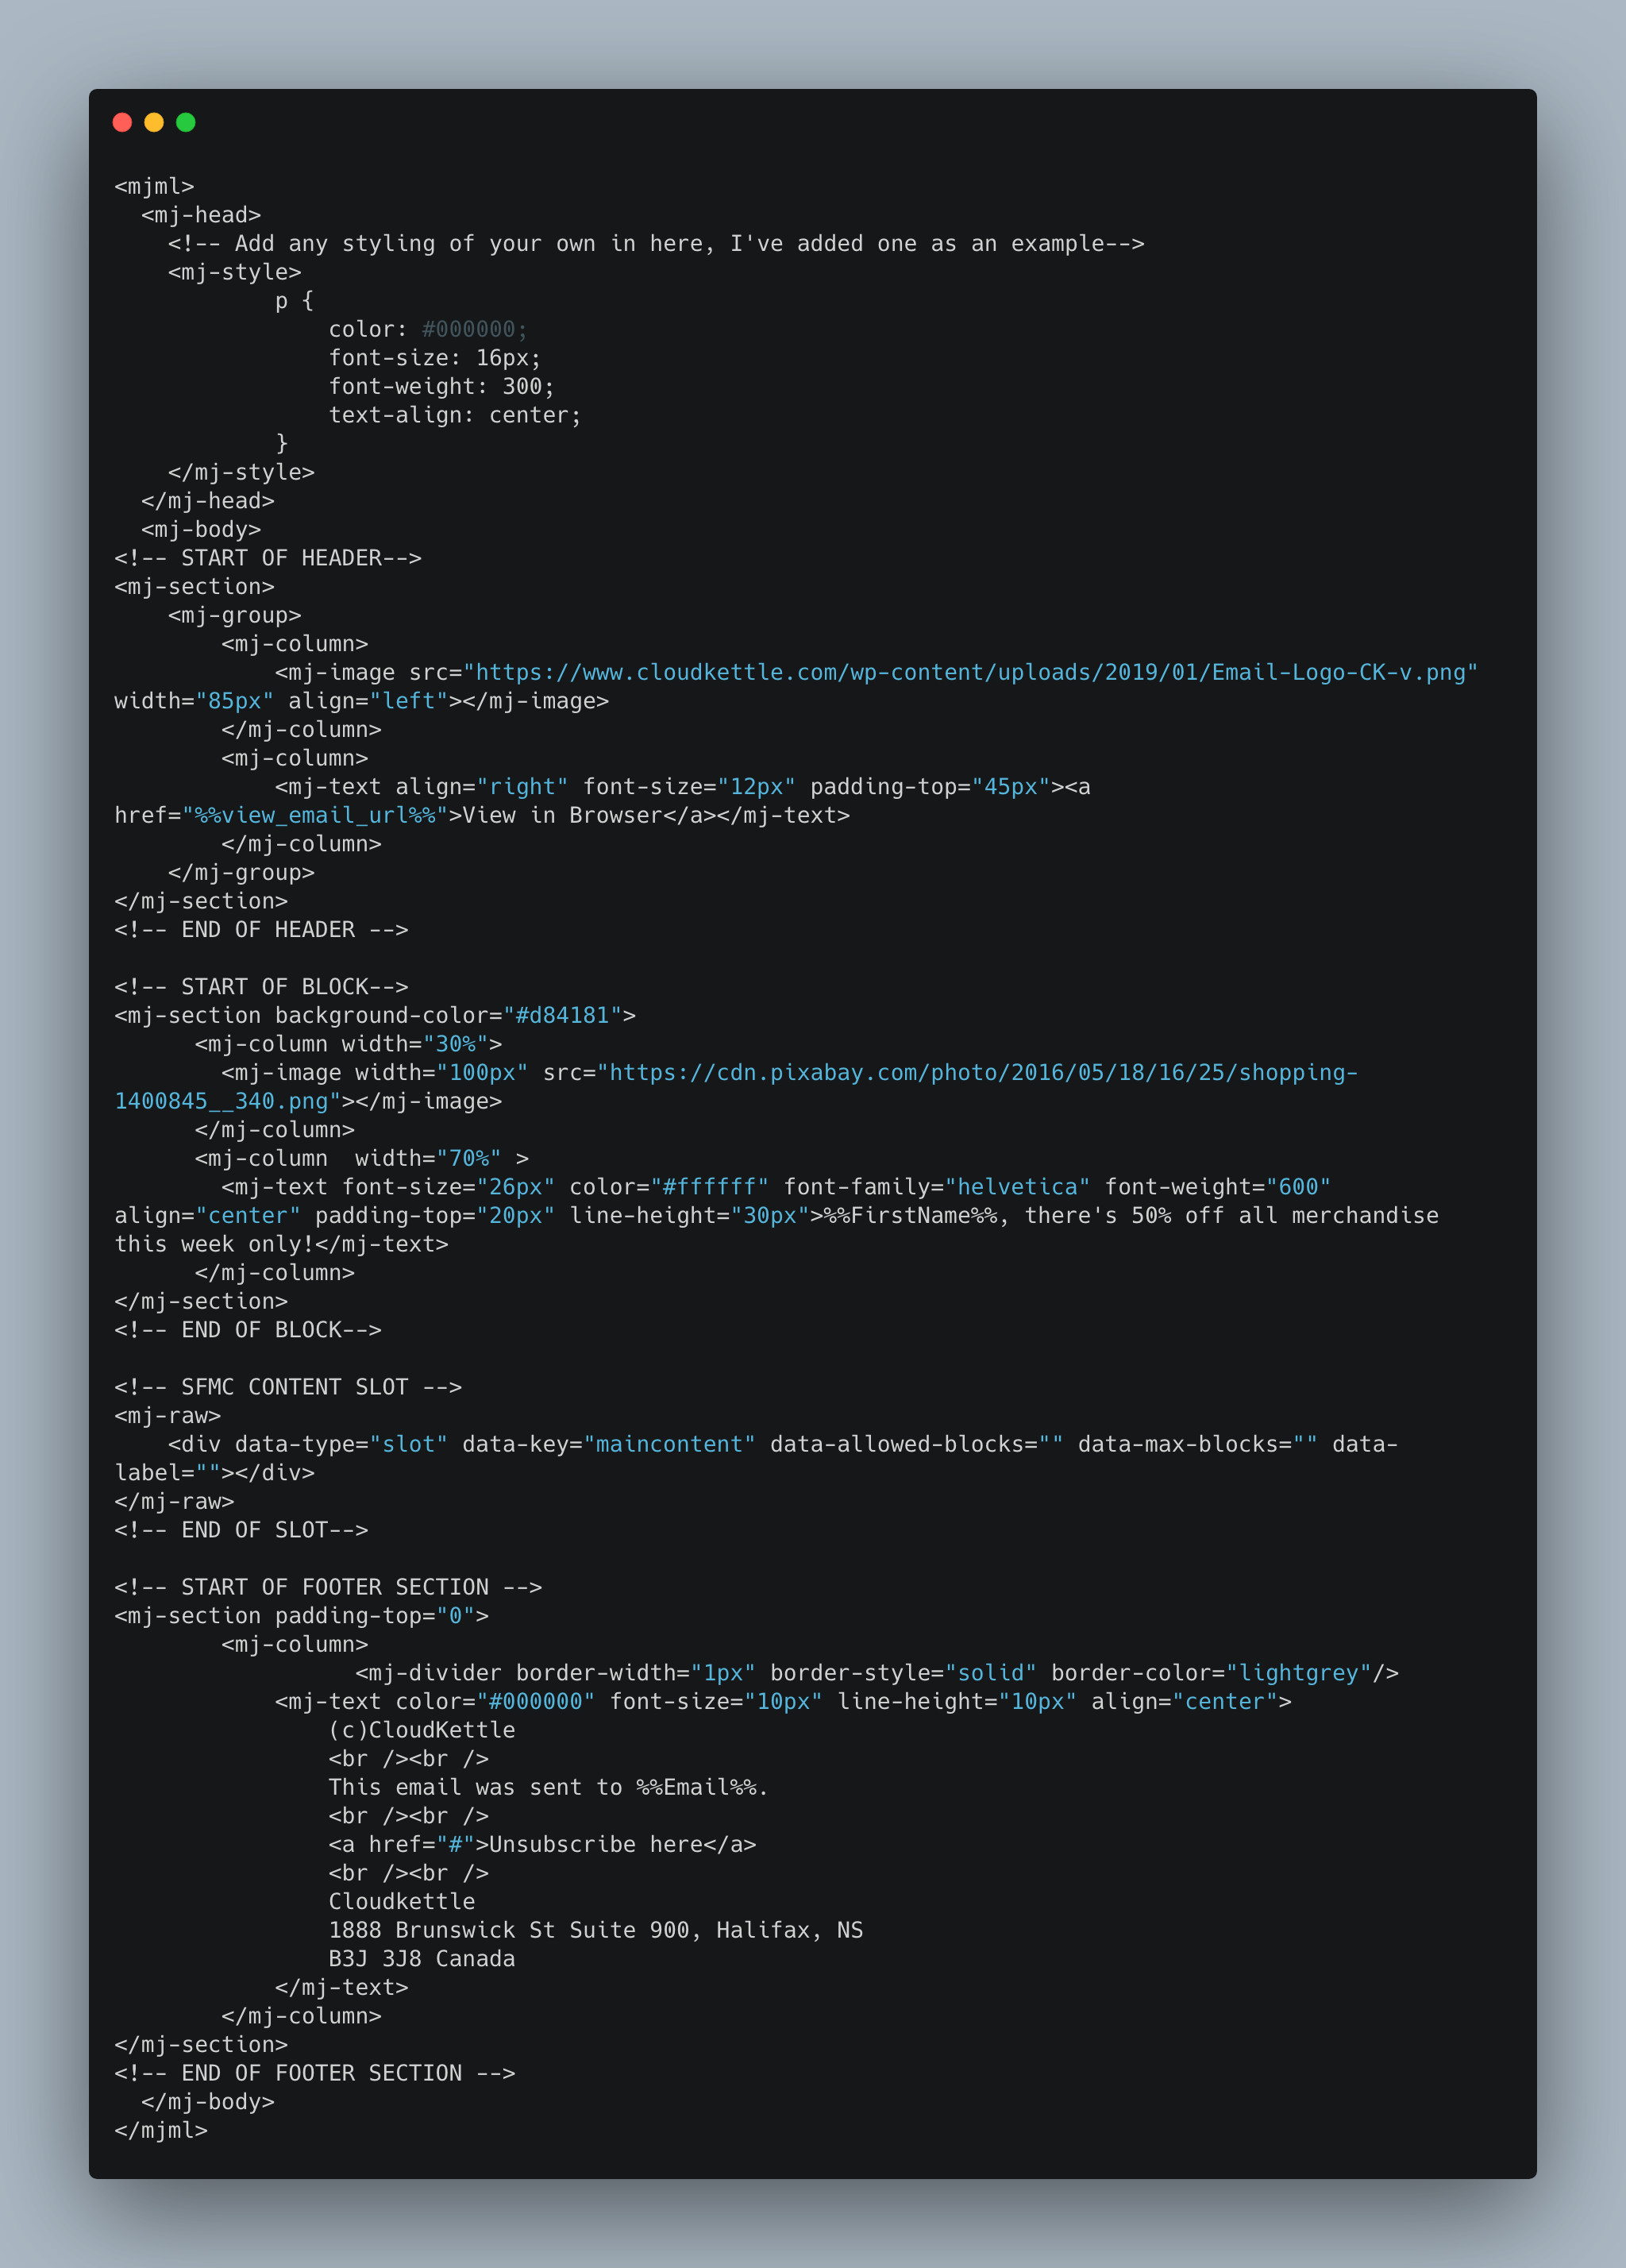
If you’ve completed all of the steps above, you now have a template and a content block that you can iterate on in the future to make emails with. Below you’ll find the full MJML code that we created in this article.
Next Step: Free Resources
If you found this article valuable and are looking for information on how to get started with MJML, take a look at the resources and Trailheads below:
Have Questions About How to Create Custom Blocks Using MJML in Marketing Cloud?
Have questions about best practices and considerations when using MJML to create custom content blocks in Marketing Cloud? Sign up for our newsletter! We send out a monthly recap of our latest Salesforce Marketing Cloud content, including articles on preference and consent management, actionable insight on Marketing Cloud optimization for enterprises, and more.